A Complete Guide to Getting Your Fence Foundation Right
Setting wood fence posts at the correct depth is one of the most critical steps in building a fence that will stand strong for decades. Dig too shallow and your fence will lean, wobble, or topple in the first strong windstorm. Dig too deep and you waste time, effort, and materials. This guide covers everything you need to know to get the depth just right—whether you’re a first-time DIYer or a seasoned builder looking for a quick refresher.
The Golden Rule: One-Third Underground

The most widely accepted guideline among fencing professionals and building experts is the one-third rule: bury at least one-third of the total post length below ground. So if you’re working with an 8-foot post, at least 2 feet and 8 inches should be underground, leaving roughly 5 feet and 4 inches above grade. This ratio provides the leverage needed to resist wind loads, ground movement, and the lateral forces that act on a fence over time.
Quick Reference: Post Length vs. Recommended Depth
|
Total Post Length |
Minimum Hole Depth |
Above Ground |
Recommended Use |
|
6 feet |
2 feet |
4 feet |
Short garden fences |
|
7 feet |
2 feet 4 inches |
4 feet 8 inches |
Standard privacy fences |
|
8 feet |
2 feet 8 inches |
5 feet 4 inches |
Tall privacy fences |
|
10 feet |
3 feet 4 inches |
6 feet 8 inches |
Agricultural / security |
|
12 feet |
4 feet |
8 feet |
Commercial / windbreaks |
Note: These are minimum depths. Adding 6 extra inches is always a wise precaution, especially in regions with freeze-thaw cycles or loose soil.
Factors That Affect How Deep You Should Dig
1. Frost Line Depth
In regions where the ground freezes in winter, your post holes should extend below the local frost line. When water in the soil freezes, it expands and can push shallow posts upward—a phenomenon known as frost heave. Check your local building codes or consult a frost depth map for your area. In northern states, the frost line can range from 36 to 72 inches deep, meaning the one-third rule alone may not be sufficient. In these climates, many builders aim for a minimum of 36 inches regardless of post height.
2. Soil Type
The composition of your soil plays a major role in how well a post stays anchored. Dense clay soil grips posts tightly and offers excellent lateral resistance, so you can often stay close to the one-third rule. Sandy or loose, gravelly soil drains well but provides less grip, so going deeper—or using wider holes with more concrete—is advisable. Rocky soil can be challenging to dig but typically provides solid anchoring once the post is set.
3. Wind Exposure
A privacy fence with solid panels acts like a sail in the wind. If your property is in an open, exposed area—hilltops, coastal zones, or wide-open plains—you’ll want to dig deeper and consider using larger-diameter posts. Adding 6 to 12 extra inches of depth for high-wind areas is a common professional recommendation.
4. Fence Height and Style
Taller fences naturally need deeper post holes because they catch more wind and exert greater leverage on the base. A 6-foot privacy fence demands deeper posts than a 4-foot picket fence. Additionally, solid panel fences require deeper posts than open designs like split-rail or spaced-picket styles that allow wind to pass through.
5. Local Building Codes
Always check with your local building department before breaking ground. Many jurisdictions specify minimum post depths, footing requirements, and setback distances. Failing to meet code can result in fines, mandatory removal, or issues when selling your home.
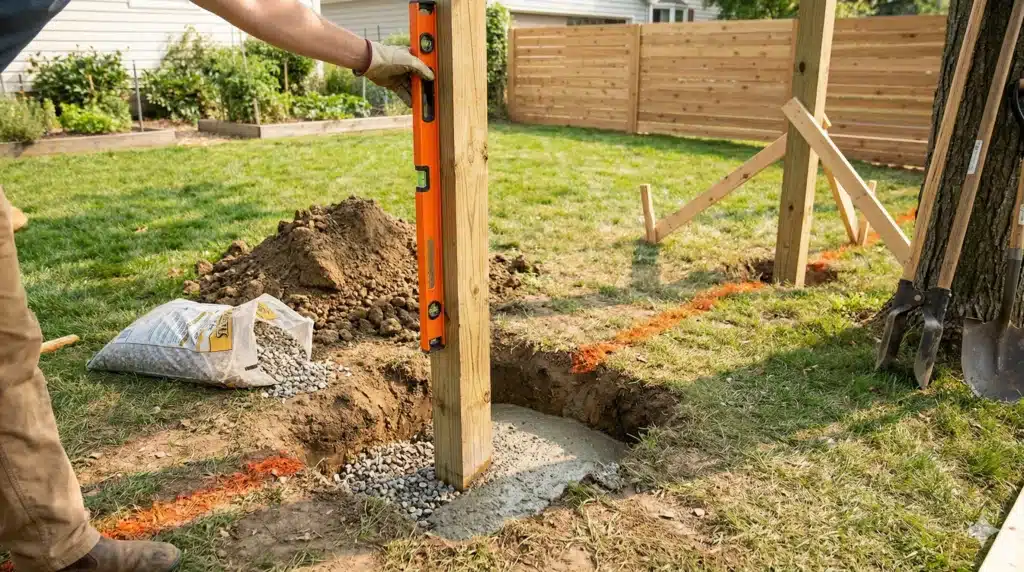
Step-by-Step: Digging and Setting Your Posts

- Mark your post locations. Use stakes and string to outline your fence line. Space posts 6 to 8 feet apart, measuring from center to center. Mark each post location with spray paint or a stake.
- Dig the holes. Use a post hole digger or power auger to excavate each hole. Make the hole approximately three times the width of the post (so about 12 inches wide for a standard 4×4 post). Dig to your calculated depth, adding 6 inches at the bottom for a gravel drainage base.
- Add a gravel base. Pour 4 to 6 inches of crushed gravel into the bottom of each hole. This layer promotes drainage away from the base of the post, reducing moisture rot and extending the life of the wood.
- Set the post. Place the post in the hole and use a level to check it for plumb on two adjacent sides. Have a helper hold it steady or use temporary braces.
- Fill and secure. Pour premixed concrete around the post, filling the hole to a few inches below ground level. Slope the top of the concrete away from the post so rainwater sheds away from the wood. Alternatively, pack the hole with tamped gravel for a concrete-free installation, though this provides less rigidity.
- Brace and cure. Keep the posts braced and undisturbed for at least 24 to 48 hours while the concrete sets. Avoid attaching rails or panels until the concrete has fully cured.
Common Mistakes to Avoid
- Digging too shallow. This is the number one cause of leaning fences. It may seem like you’re saving effort, but a shallow post will cost you far more in repairs and frustration down the road.
- Skipping the gravel base. Without drainage, water pools at the bottom of the hole, accelerating rot even in pressure-treated lumber.
- Using untreated wood below ground. Always use posts rated for ground contact. Look for pressure-treated lumber labeled “UC4A” or “UC4B” for in-ground use.
- Ignoring the frost line. In cold climates, frost heave can push posts right out of the ground within a single winter if the hole isn’t deep enough.
- Setting posts in wet concrete without bracing. Posts can shift before the concrete cures. Always brace them and double-check plumb before walking away.
Concrete vs. Gravel: Which Should You Use?
|
Factor |
Concrete |
Tamped Gravel |
|
Stability |
Excellent—rigid hold |
Good—moderate hold |
|
Drainage |
Can trap moisture |
Excellent drainage |
|
Post replacement |
Difficult to remove |
Easy to remove and reuse |
|
Cost |
Moderate |
Low |
|
Best for |
High fences, windy areas |
Short fences, easy repairs |
Pro Tips for Long-Lasting Fence Posts

- Apply a brush-on wood preservative or roofing tar to the buried portion of each post for an extra layer of moisture protection.
- Crown the concrete footing so water drains away from the post rather than pooling against it.
- Consider using post sleeves or metal brackets that keep the wood above the concrete, eliminating direct wood-to-ground contact entirely.
- Rent a power auger if you have more than a few holes to dig. Your back will thank you, and the holes will be more consistent.
- If you hit rock or a root, shift the post location by a few inches rather than forcing a shallow hole. A slightly adjusted post line is far better than a weak one.
Final Thoughts
Getting the depth right is the foundation—literally—of a strong, attractive, long-lasting wood fence. Start with the one-third rule, adjust for your local frost line, soil conditions, and wind exposure, and always check with local building codes before you dig. A little extra effort at the post-setting stage pays off for years in a fence that stands straight and proud through every season.
Happy building, and here’s to a fence that stands the test of time!